

Displaying Your Family Photos
Step by step tutorial for building your family’s wall gallery
Welcome to your personalized family art gallery! As a seasoned family photographer, it has been my privilege to capture beautiful moments that families will cherish for a lifetime. Today let’s explore crafting the perfect showcase for your family’s personality; a custom family wall gallery.
Before we begin, a note on the focus of this guide: we’ll be concentrating on framed photos rather than canvas prints. As both a photographer and a parent myself, I advocate for frames due to their versatility. Kids grow rapidly and your family is ever changing. Why should you be stuck with a single canvas when you can change your photos in a frame? This flexibility is why I believe that prints are the best option, especially young families. Now, let’s dive into the process.
Step 1: Choose Your Photographs
When selecting photographs for your wall gallery, prioritize images that bring a smile to your face and display the joy of your family.
Keep your photo colors in mind when selecting the photos for your wall gallery. Maybe you want a simple and high contrast display; black and white images will be a great option for your gallery. Personally, I love warm images and I tend to select all my photos with tones of yellow and orange throughout the image.
You are going to have multiple photos working together to create a whole wall gallery, so think about how all the photos will all look together and plan for the entire display.
Step 2: Select Your Frames
After choosing the perfect photos, the foundation of any wall gallery is the frames that house them. This step requires some creative thought because they will be enjoyed for years to come by your family and friends. What is the style that best matches your family and home? Is it:
Minimalist: Opt for frames with clean lines and neutral tones. Black or white frames with white mattes work well to complement the simplicity of minimalist design.
Natural: Search for natural wood tones to give your wall gallery a warmer touch. Select mattes in neutral tones to complement the natural frames.
Eccentric: For a more eccentric look, select a variety of shapes and sizes in various colors. To add an extra dash of whimsy, mix and match your frame and matte colors. Get inspired by the colors in the photos to pick complementary hues for an eclectic display.
Here are some of my favorite frames from Amazon.
- 9 Piece Woodgrain Frames
- 6 Woodgrain Frames, various sizes
- 7 Black Wall Gallery Frames
- 9 Square Display Frames
Quick and Easy Wall Galleries: Here is my favorite online wall gallery store. This is simple and easy to use. Just select your frames, upload the photos and they are shipped straight to your home.
*Pro Tip: Sign up for their free membership because they offer discounts all the time!
In your planning, keep an eye out for consistency in frame style. Andwhatever style you are doing, pay attention to how each frame works in the whole of the gallery. This will help ensure that you don’t purchase frames that you don’t need.
Step 3: Plan Your Layout
Before hanging your frames, take a moment to plan the layout of your gallery. Envision what you want it to look like, what emotions you want to evoke, how your eye will be drawn across the images, and the overall feel of your wall gallery. Then, measure your wall space and experiment with different configurations by arranging your frames on the floor.
Here are some of my favorite wall gallery configurations to bring on some inspiration.
-
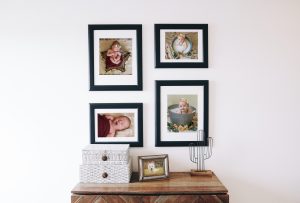
- Grid
-
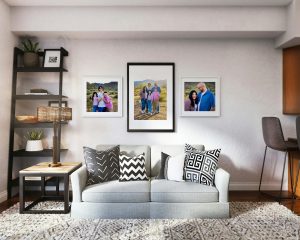
- Minimalistic
-

- Eccentric
Step 4: Hang Your Frames
Once you’ve finalized your layout, it’s time to hang your frames. Use a level and measuring tape to ensure precision in placement. This is where laying out the design on the floor first really comes in handy. Measure as you go, keep track of your plan, and hang each photo, one at a time.
Pro Tip: Pay close attention to spacing between frames to maintain your consistency. If the spacing is just the slightest bit off it can really throw off your design and I promise it will begin to bug you every time you see it.
Step 5: Enjoy the Results
Step back and admire your handiwork! Enjoy the beauty of a family wall gallery that you constructed. Each frame serves as a window into a moment of your family’s unique joy and beauty. Whether your wall gallery is in a living room, hallway, or bedroom, your photos will bring joy every time you look at them.
Congratulations! You did it! By following these simple steps, you’ve transformed your home into a custom family masterpiece. I hope that your gallery serves as a daily reminder of the great and wonderful blessing your family is.